Silver-Based and Non-Silver-Based Photography, Pt. 2
In this segment, taken from his 2008 talk at the Museum of Modern Art, New York, for his exhibition The Printed Picture, Richard Benson walks us through non-silver processes of printing photography. He gives an overview of carbon printing, the Woodburytype, gum bichromate, blueprints, platinum printing, and palladium printing. Pictures associated with each of the main themes presented in the segment can be found by clicking on any of the section links below.
Non-Silver Processes Introduction (see Early Photography in Silver)
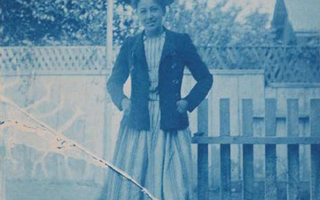
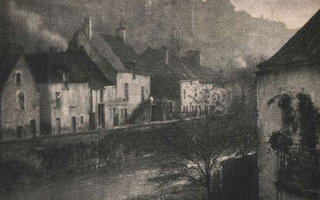
Blueprint. Photographer unknown. Elizabeth Perry Howard. c. 1890. 4 1/2 x 3 7/16” (11.4 x 8.7 cm). The Museum of Modern Art, New York. Gift of Richard Benson. Printed from a cracked glass dry-plate.
In the nineteenth century a great many odd and obscure printing processes were developed that did not involve silver, the most significant of them using either colloids (such as gelatin) that could be hardened or iron compounds that would change upon exposure to intense light. There is a large difference in the light energy needed to make a negative and to make a print. The negative is usually made in a camera, whose lens focuses the light that goes through it so that any point on the negative only receives light from a single point on the subject.
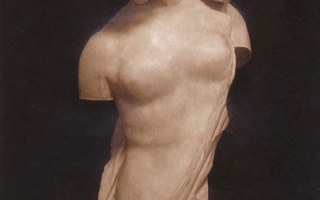
Carbon print. Edizioni Brogi. Psyche. c. 1910. 14 1/2 x 11” (36.8 x 27.9 cm). The Museum of Modern Art, New York. Gift of Richard Benson.
Here is a simplified description of carbon printing. It starts with a sheet of gelatin-coated paper, which would have been purchased ready made. This paper is insensitive to light, but holds a relatively thick coating of gelatin that has had a great deal of pigment worked into it. The paper, called “carbon tissue,” curls severely because the gelatin is only coated on one side. A sheet of it is cut to the desired print size and immersed in a weak solution of potassium bichromate, then withdrawn and squeegeed onto a polished sheet of chrome-plated steel called a “ferrotype tin.” After being dried, usually with a fan, the sheet comes off the ferrotype with a highly polished surface. This carbon tissue—which the potassium bichromate has sensitized to blue light—is exposed by contact to a negative, usually with sunlight or an electric arc lamp.
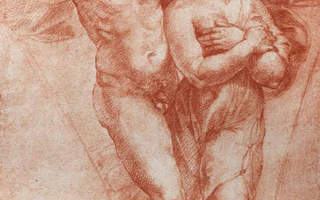
Carbon print. Raphael Sanzio. Cupid and Psyche. c. 1510. (Printed by Adolphe Braun, c. 1880). 13 1/2 x 9” (34.3 x 22.9 cm). The Museum of Modern Art, New York. Gift of Richard Benson.
After exposure, the paper is immersed in a tray of cold water for a few minutes and then, while submerged, brought into contact with a sheet of “receiver” paper, which has a prepared surface that will stick to the gelatin. This sandwich of two sheets—hopefully with no bubbles between them—is then taken out of the tray and placed under a weight for about a half hour. Next, the pair is immersed in a tray of hot water at about 100 degrees Fahrenheit. After a few minutes in the hot water, gelatin and pigment can be seen oozing out of the sandwich, indicating that the gelatin has softened. The carbon tissue can then be gently peeled off the receiver sheet. Once this is done, the print appears on the receiver, and a few more minutes of gentle rocking washes away the remaining soluble gelatin and its pigment.
The process is completed by shifting to cold water and then air-drying the print (which will tenaciously try to ruin itself by curling). If this sounds complex, it is. Unfortunately the print thus made is backward—reversed from left to right. This is corrected by once more wetting the print and transferring the gelatin from the old receiver to a new one. Then the final print can be dried and mounted to permanently counteract its tendency to curl. Carbon printing is the only practical photographic process that can make monochromatic prints in any color. The tissue is prepared with pigmented gelatin, and the pigment used can be virtually any that is available to painters. Since most of those colorants are inert, which is to say that they can be mixed in water or oil without reacting or changing color, carbon tissue could be manufactured and sold in a wide range of colors.
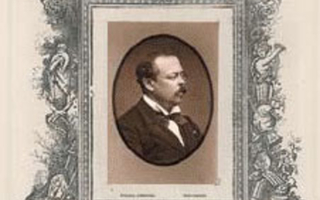
Woodburytype. Etienne Carjat. Aurélien Scholl from Paris—Theatre (vol. 5, no. 235), November 15–21, 1877. 1887 (Printed by Lemercier et Cie). 3 1/2 x 5” (8.9 x 12.7 cm). The Museum of Modern Art, New York. Gift of Richard Benson.
Although technically demanding, woodburytypes used cheap materials (and the cheap manual labor of the nineteenth century) and were often employed for theater bills and publicity for celebrities.
Chemically based photographic processes derive their color from characteristics of the chemicals used. Gold-toned albumen prints are purplish because that is the color produced by that particular chemistry. The carbon print avoids this restriction because it can be made with any pigment as its colorant. The woodburytype too has this freedom, since it is actually a cast replica of a carbon print, made out of the very same gelatin and pigment as the carbon original. I have little doubt that the woodburytype is the craziest process of them all. The carbon print varied in thickness according to the amount of hardened gelatin left on the print. Where a tone was dark, the pigmented gelatin was thick; where light, the layer was thin.

Woodburytype. Photographer unknown. Ludovic-Napoléon Lepic from Galerie Contemporaine. c. 1877. 17 5/8 x 10” (44.7 x 25.4 cm). The Museum of Modern Art, New York. Gift of Richard Benson.
The small woodburytype has been pasted onto a sheet that has letterpress reproductions of drawings printed on it.
A woodburytype began with a carbon print, developed not onto a sheet of paper but onto a piece of glass. Once dry, the thin layer of gelatin—carrying all the modulations of height that derived from exposure—was pressed under extreme pressure into a sheet of lead, which took on the form of the gelatin (but as a negative, of course—thin where the gelatin was thick). This lead sheet was then used as a mold: hot, pigment-bearing gelatin was poured into it; a piece of paper, carefully manufactured to be of a consistent thickness, was placed on top of the hot gelatin; and the sandwich thus made—lead/gelatin/paper—was put in a press and squeezed. The excess gelatin ran out the sides, and after it cooled, a perfect print could be pulled off the mold.
The gelatin, bearing its pigment, then varied in thickness in exactly the same way that it had in the original carbon. The woodburytype plate was hard to make, but once done it could generate a lot of inexpensive prints. They curled terribly and the borders were always a mess, from the excess gelatin squeezing out, so they were always mounted. The woodburytype used no silver, which saved money, and it could produce monochromatic prints in any color, according to the pigment used. The prints were also never wet, so all the complex handling of wet paper was avoided. Most of them were colored to imitate albumen prints, so the viewers believed they were seeing a “real” photograph. The technology didn’t allow prints much bigger than eight by ten inches, but these beautiful little prints never had to go into a hypo bath so they are remarkably permanent. Woodburytypes were most often used for theater bills and popular magazines; the one on the previous page is from Galerie Contemporaine, a Parisian publication that was more or less the People magazine of its time. Both woodburytypes and their parent, the carbon print, sometimes show relief in the images when viewed along their surface in a hard light.
Gum bichromate. C. H. Roblot. Untitled. c. 1910. 6 7/16 x 7 7/8” (16.4 x 20 cm). The Museum of Modern Art, New York. Gift of Richard Benson.
Most photographic processes were capable of rendering an accurate series of tones, running smoothly from dark to light. When the images were made with pigment, as in the carbon process, a technical problem arose because between the exposed, hardened surface of the gelatin and the paper was soft, unexposed gelatin. If such a print was processed in hot water the soft gelatin would melt and the hardened image would simply float off the paper. This difficulty was met by attaching the exposed surface to a different support from the one that had originally held it, transferring the image to a new sheet.
A lot of work went into finding a way to make pigment prints that did not require such a transfer, and one method that survived and enjoyed some popularity was the gum bichromate process. In this case the colloid used was gum Arabic instead of gelatin, and it was heavily pigmented and coated on a sheet by brushing it on while warm. A “toothy” sheet of rag paper was used, and the coating was designed so that, after exposure, it could be wetted and rubbed manually to loosen the soft gum while leaving the hardened gum and its pigment stuck to the paper fibers. Unlike all the other processes we have examined, gum bichromate did not produce a fine scale of tones. The retention of gum and pigment was haphazard, and since the toothy paper itself was the matrix that defined the tonal particles, the images were grainy. The rubbing that developed the image was done by hand and could strongly affect the way the picture looked. In some cases gum was printed on top of a platinum print, which allowed the smooth rendition of the latter process to support the heavy blacks that gum could produce while simultaneously covering up the graininess inherent in gum bichromate prints.
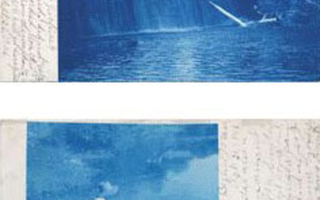
Blueprint. Artist unknown. Postcard, postmarked October 21, 1906. 3 1/4 x 3 1/4” (8.3 x 8.3 cm). The Museum of Modern Art, New York. Gift of Richard Benson.
Blueprinting lent itself to the homemade postcard. These two date from 1906, when there was still some confusion about whether writing could appear on the address side of the card.
A number of “ferric” iron compounds undergo a chemical change when exposed to high levels of light, becoming “ferrous” instead and behaving very differently from the way they did in their former state. Of the several printing processes that use this mechanism the most common is the blueprint, which in fancy circles is known as the “cyanotype.” The image is formed from an insoluble iron compound known as Prussian blue. This material has a long history as a dye, and was also used in machine shops to reveal inaccuracies in bearing surfaces that were being finished by hand. Blueprints are contact prints made from original pen-and-ink drawings. They are really negatives: the blue background is composed of the iron compound.
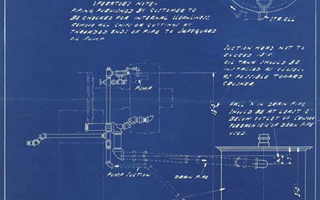
Blueprint. Nordberg Manufacturing Company, Milwaukee, Wisconsin. 3’ Symons Cone Crusher: Piping & Tank Layout. 1939. 17 5/8 x 12” (44.8 x 30.5 cm). The Museum of Modern Art, New York. Gift of Richard Benson.
Nordberg’s in-house identification stamp has been applied to this print at the upper left through a series of punched holes giving the company name.
If an expensive material like silver were used, the prints would cost many times as much; instead they are extremely cheap, and the processing is simplicity itself—just washing the exposed print in water. For decades this was the process used to make all the blueprints that codified and dispensed engineering information, which had to be shared if people were to work together to make battleships, skyscrapers, and other complex constructions. In the 1950s the blueprint began to be replaced by the diazo print, a dye process that lends itself to mechanization and the use of automatic exposure and developing equipment. This new process avoided the messiness of developing the large blueprints needed for industry.
The blueprint has a beautiful photographic tonal scale, never seen in the engineering drawings that the process reproduced; those are chiefly composed of solid lines without intermediate tones. Many photographers working out in the field, or with severe financial restraints, used the blueprint as their primary process because it was simple, cheap, and permanent. These prints had just one serious drawback: they were brutally blue. We can accept the world turned into neutral gray, and even into the range of purples and reds that characterized early silver printing, but the blue does become tiresome after a while. Only a few serious artists used this medium, and then only sparingly. When we look outside the sphere of the well-known early photographers, though, we find a wide range of marvelous pictures printed this way. Almost all of them show a straightforward, workaday approach to the medium that can be a great relief if we have spent too much time wandering the halls of proper, refined photographic art.
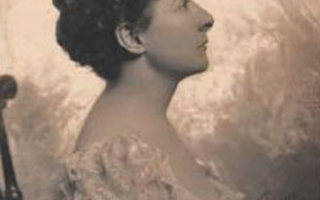
Platinum print. Ernest W. Histed. Emma James. 1900. 9 1/2 x 7 11/16” (24.2 x 19.5 cm). The Museum of Modern Art, New York. Gift of Richard Benson. A professional studio portrait, printed in platinum and probably toned with mercury to alter the neutral platinum color.
The blueprint might have made more pictures but the visual king of the iron processes was the platinum print. This method, invented in 1877 by William Willis, used the iron compound ferric oxalate as a sensitive material that, after exposure, could reduce a platinum salt to a visible metallic deposit. The paper was very sensitive to moisture but after manufacture could be sealed in metal containers and sold, so that photographers could make these prints without having to do complex chemical shenanigans. The irony is that the process is very easy to do from scratch without buying anything except the raw chemicals and the paper onto which they will be coated. It is worth explaining, because the practice of hand-coating a sheet for photographic printing purposes is simple and greatly enjoyable as a craft.
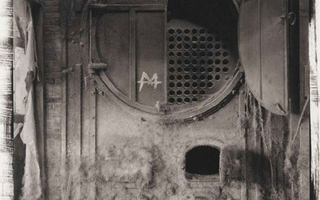
Platinum print. Richard Benson. Fall River Boiler. 1978. 16 7/16 x 13 1/16” (41.7 x 33.1 cm). The Museum of Modern Art, New York. Gift of Richard Benson © Richard Benson.
This print is untrimmed, showing the brushmarks made when the sensitive iron/platinum coating was applied to the sheet of Crane’s stationery that was the basis for the print.
A coating made this way is not an emulsion—not a suspension of some material in another, like the silver salts dispersed in the gelatin coatings of film. To make a platinum print the raw chemicals are just dissolved in water, stored in bulk in separate bottles, and then mixed in careful proportions just before coating. The measuring is done with eyedroppers—so many drops of sensitizer (the iron compound), so many of metal (the platinum salt), and so many of other chemicals that control contrast. The drops are swirled together (perhaps in a ramekin stolen from the kitchen) and then poured right onto the center of the paper. The liquid is evenly spread with a broad, high-quality watercolor brush, then dried with a hair dryer (perhaps stolen from the family bathroom).
In the print shown on the previous page we can see the marks of the watercolor brush extending past the image area. After the sheet is dry it is exposed to the negative, by contact, using either sunlight or some short-wavelength lamp. Once exposed (for five minutes or so in good sunlight), the print is placed face up in a tray and a developer is poured on top of it. The image appears instantly. Modern gelatin-silver papers develop slowly, as the gelatin emulsion controls the action of the developing chemicals. The platinum print uses no emulsion so the chemical reaction of development is nearly instantaneous. After a minute or so the print is cleared in a weak acid (which removes the iron compounds and unused platinum), rinsed for a while in running water, then dried on a screen. The wet print is always more beautiful than when it dries. It takes a strong mind to put the memory of the wet print away and to accept the one that has dried by a few hours later. Some photographers in the past varnished or waxed their prints to try to retain this enticing wet look, but these treatments almost always yellowed over time and caused more damage than good.
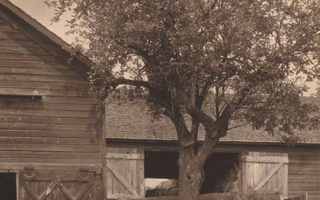
Palladium print. Alfred Stieglitz. The Barn. 1922. 9 1/8 x 7 1/8” (23.2 x 18.1 cm) © Georgia O’Keefe Museum / Artists Rights Society (ARS), New York.
The iron compound ferric oxalate turns upon exposure into ferrous oxalate, which can react to a number of salts and reduce them to their metal components. The three metals most often used in old papers involving this iron process were platinum, palladium, and silver. Platinum produced a beautiful neutral-to-slightly-bluish tone, depending on the sizing used on the paper. Palladium was much warmer, and the overall print color was brown, but this metal could also produce a far blacker deposit in the shadows than could platinum. Silver reduced by iron made a greener deposit. A paper called “Satista,” made with this less expensive metal, was used a bit in the first part of the twentieth century, most notably by Paul Strand, but it was quite unstable and never very popular. Both platinum and palladium papers were extraordinarily stable, and prints made with these metals are the most long-lasting of all chemical photographs.
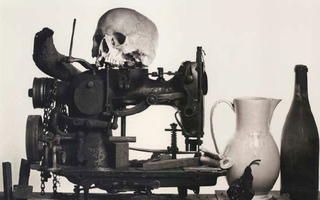
Platinum and palladium print. Irving Penn. Composition with Skull and Pear, New York. 1979. 11 7/8 x 19” (30.2 x 48.3 cm). © 1981 Irving Penn.
The prints must be properly cleared and washed, but no hypo is involved in their production. A properly made platinum might degrade after many years through changes in the paper support; the metal deposit itself is absolutely permanent. The Platinotype company manufactured papers that were pure in either platinum or palladium. They also made some alternate versions that used a mixture of the metals, with names like “Black Palladio.” Homemade platinum prints almost always incorporate both metals. One reason for this is expense: palladium is much cheaper than platinum. The other reason is to get the deep black of palladium coexisting with the neutral tones of platinum. When I printed this way I always kept an eye on the Russian wheat harvest; when it was bad, Russian reserves of palladium and platinum flooded the market, to generate income for the purchase of grain from the United States. The prices of these precious metals fell and I filled my bottles to the brim.
Platinum and palladium prints were touted as having the finest tonal scale, but this is simply not true. The papers had matte surfaces, which cannot hold as long a range of tones as glossy ones. Platinum and palladium have the additional problem of being deposited right in the paper fibers, so that not only are the blacks weak (compared to a gloss black) but the detail in the shadows tends to be obscured by the paper. Nevertheless, a great platinum or palladium print is a wonder, and can convey photographic description in a manner unlike any other process. The secret here is not to judge these prints by comparison to other processes but to view them by themselves. Comparison drags things being judged down to their common denominators, and clouds our eyes to the special qualities of each one.